


FIRST OF ALL, WHAT EXACTLY IS STATE?!
When a user interacts with our app, some information gets updated , which in turn may change/update one or more widgets or our entire application User interface. That information is called our application State. We have 2 types of state in flutter:
- Local / Ephemeral State
- Shared / Global / App State
LOCAL STATE : When the information/state of a single screen/widget changes, then its considered a local state. Stateful widget are usually used for this type of widgets/screens.
SHARED STATE : When an information/state changes or updates multiple screens/widgets across an application then its a shared / global / app state.
SO WHAT IS THIS STATE MANAGEMENT?
State Management is the well thought out approach to manage all the interactions that a user makes on our application and then based on the users interaction, changes are made to the app user interface, requests are made to the server e.t.c
SO HOW DO I MANAGE THIS STATE?
- Using setState
Create a new project
$ flutter create teststate
TEST CASE :-
We will Be Building a simple app with three screens
SCREEN1,
SCREEN2,
SCREEN3,
SCREEN4 and
SCREEN5.
SCREEN1 will have a Textfield where whatever we enter into that Textfield will show in SCREEN3 and SCREEN5
Lets get started
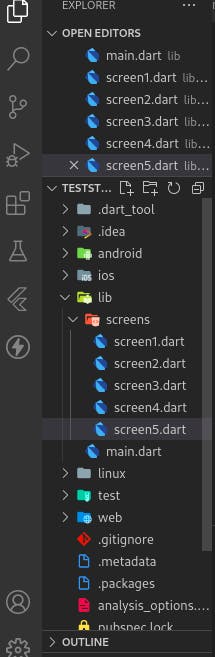
Create a new folder screen inside the lib folder, this will contain all our screens.
see image below
mian.dart
import 'package:flutter/material.dart';
import 'package:teststate/screens/screen1.dart';

void main() {
  runApp(const MyApp());
}

class MyApp extends StatelessWidget {
  const MyApp({Key? key}) : super(key: key);

  @override
  Widget build(BuildContext context) {
    return MaterialApp(
      title: 'Flutter Demo',
      theme: ThemeData(
        primarySwatch: Colors.blue,
        visualDensity: VisualDensity.adaptivePlatformDensity,
      ),
      home: const Screen1(),
    );
  }
}
Screen1 will contain a textfield to collect inputs to show on screen 3 and 5
screen1.dart
import 'package:flutter/material.dart';
import 'package:teststate/screens/screen2.dart';

class Screen1 extends StatefulWidget {
  const Screen1({Key? key}) : super(key: key);

  @override
  State<Screen1> createState() => _Screen1State();
}

class _Screen1State extends State<Screen1> {
  String data = 'default data';
  @override
  Widget build(BuildContext context) {
    return Scaffold(
      appBar: AppBar(
        title: const Text('Screen 1'),
      ),
      body: Container(
        padding: const EdgeInsets.all(20),
        child: Column(
          crossAxisAlignment: CrossAxisAlignment.center,
          children: [
            const SizedBox(height: 30),

            // Data From User
            Text(
              data.toString(),
              maxLines: 5,
            ),

            const SizedBox(height: 30),

            // TextField To Take Inputs From User
            TextField(
              autofocus: true,
              decoration: const InputDecoration(
                border: OutlineInputBorder(),
              ),
              onChanged: (value) => {data = value},
            ),

            const SizedBox(height: 30),

            // Button To update Data & UI
            ElevatedButton(
              onPressed: () {
                setState(() {});
                Navigator.push(
                  context,
                  MaterialPageRoute(
                    builder: (context) => Screen2(
                      data: data,
                    ),
                  ),
                );
              },
              child: Icon(
                Icons.arrow_forward,
              ),
            )
          ],
        ),
      ),
    );
  }
}
Take a look at our application screen1 button i.e the ElevatedButton()
     // Button To update Data & UI
            ElevatedButton(
              onPressed: () {
                setState(() {});
                Navigator.push(
                  context,
                  MaterialPageRoute(
                    builder: (context) => Screen2(
                      data: data,
                    ),
                  ),
                );
              },
              child: Icon(
                Icons.arrow_forward,
              ),
            )
it contains setState which simply rebuilds the Screen1 UI and updates our data variable var data;.
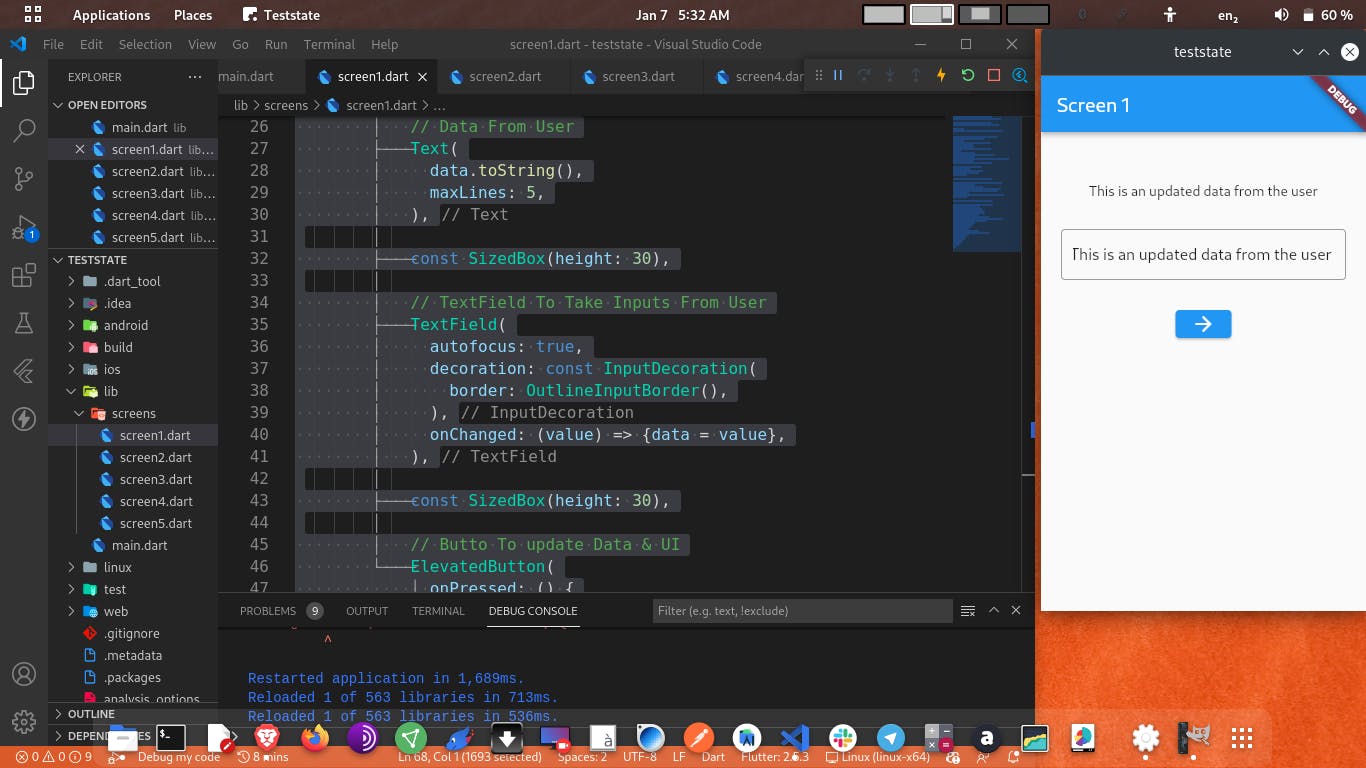
To Update Screen3() and Screen5(), we passed the updated data to the next screen, using named parameter Screen( data:data ) through Navigator.push()
screen2.dart
import 'package:flutter/material.dart';
import 'package:teststate/screens/screen3.dart';

class Screen2 extends StatelessWidget {
  var data;
  Screen2({Key? key, required this.data}) : super(key: key);

  @override
  Widget build(BuildContext context) {
    return Scaffold(
      appBar: AppBar(
        title: const Text('Screen 2'),
      ),
      body: Container(
        padding: const EdgeInsets.all(20),
        alignment: Alignment.center,
        child: Column(
          crossAxisAlignment: CrossAxisAlignment.center,
          children: [
            // const Text('data'),
            ElevatedButton(
              onPressed: () {
                Navigator.push(
                  context,
                  MaterialPageRoute(
                    builder: (context) => Screen3(
                      data: data,
                    ),
                  ),
                );
              },
              child: const Icon(
                Icons.arrow_forward,
              ),
            )
          ],
        ),
      ),
    );
  }
}
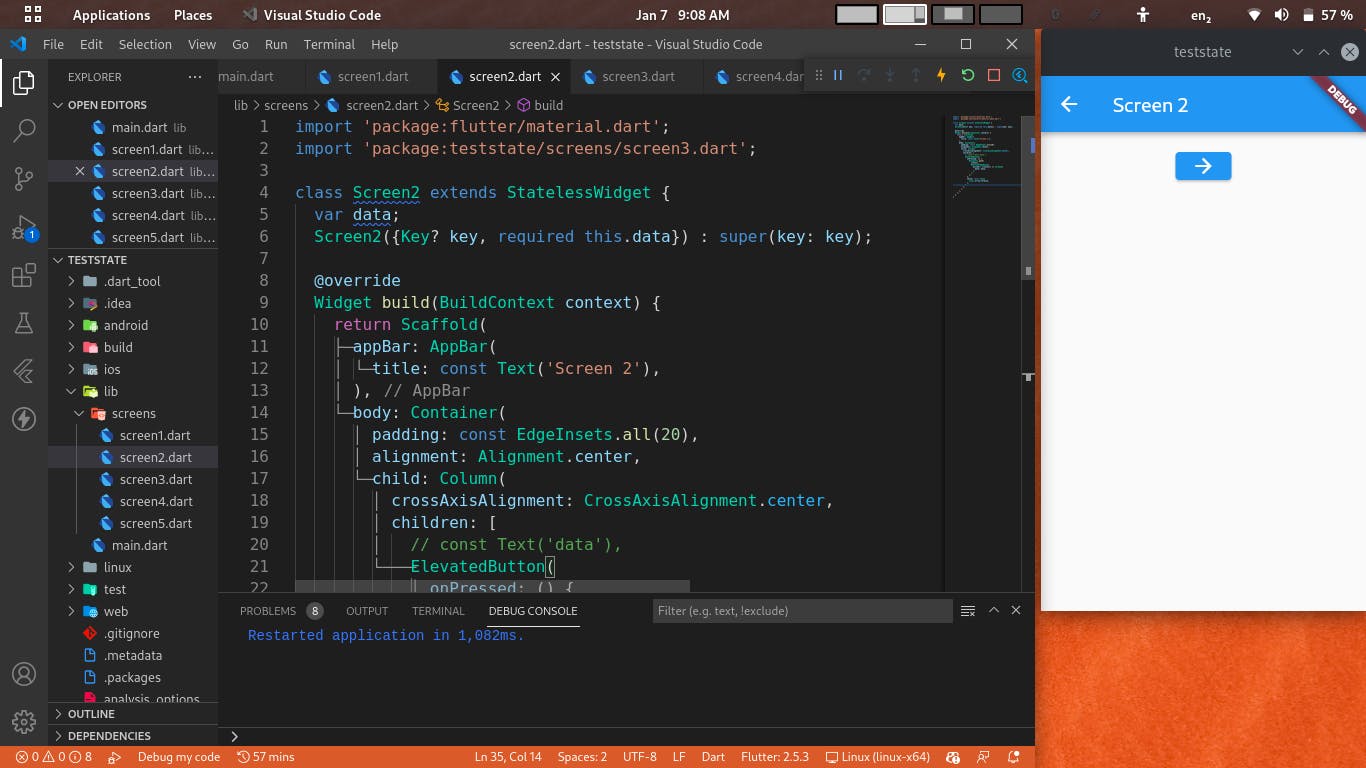
We want the data to be in Screen3() & Screen5(), so we pass on the data using named parameter through Navigator.push()
screen3.dart
import 'package:flutter/material.dart';
import 'package:teststate/screens/screen4.dart';

class Screen3 extends StatelessWidget {
  var data;
  Screen3({Key? key, required this.data}) : super(key: key);

  @override
  Widget build(BuildContext context) {
    return Scaffold(
      appBar: AppBar(
        title: const Text('Screen 3'),
      ),
      body: Container(
        alignment: Alignment.center,
        child: Column(
          children: [
            const SizedBox(height: 30),

            // Data From User
            Text(
              data.toString(),
              maxLines: 5,
            ),
            const SizedBox(height: 30),

            ElevatedButton(
              onPressed: () {
                Navigator.push(
                  context,
                  MaterialPageRoute(
                    builder: (context) => Screen4(
                      data: data,
                    ),
                  ),
                );
              },
              child: const Icon(
                Icons.arrow_forward,
              ),
            )
          ],
        ),
      ),
    );
  }
}

From the immediate image above, you can see that we successfully got the data on our third screen, to get the data on our fifth screen, we will pass on the data to the next screen using named parameter through Navigator.push()
screen4.dart
import 'package:flutter/material.dart';
import 'package:teststate/screens/screen5.dart';

class Screen4 extends StatelessWidget {
  var data;
  Screen4({Key? key, required this.data}) : super(key: key);

  @override
  Widget build(BuildContext context) {
    return Scaffold(
      appBar: AppBar(
        title: const Text('Screen 4'),
      ),
      body: Container(
        padding: const EdgeInsets.all(20),
        alignment: Alignment.center,
        child: Column(
          crossAxisAlignment: CrossAxisAlignment.center,
          children: [
            // const Text('data'),
            ElevatedButton(
              onPressed: () {
                Navigator.push(
                  context,
                  MaterialPageRoute(
                    builder: (context) => Screen5(
                      data: data,
                    ),
                  ),
                );
              },
              child: const Icon(
                Icons.arrow_forward,
              ),
            )
          ],
        ),
      ),
    );
  }
}

We want the data to be in Screen5(), so we pass on the data using named parameter through Navigator.push()
screen5.dart
import 'package:flutter/material.dart';

class Screen5 extends StatelessWidget {
  var data;
  Screen5({Key? key, required this.data}) : super(key: key);

  @override
  Widget build(BuildContext context) {
    return Scaffold(
      appBar: AppBar(
        title: const Text('Screen 5'),
      ),
      body: Container(
        alignment: Alignment.center,
        child: Column(
          crossAxisAlignment: CrossAxisAlignment.center,
          children: [
            const SizedBox(height: 30),

            // Data From User
            Text(
              data.toString(),
              maxLines: 5,
            ),
            const SizedBox(height: 30),
          ],
        ),
      ),
    );
  }
}

From the image we can see that we successfuly got an input from a user of our application, at screen3 and screen5.
I know what you might be thinking, this doesnt seem efficient, it rather looks hella stressfull. For those who always thinks very far ahead quickly, you might already be thinking of, how you will use this approach on your app which probably has 10 or more screen. It looks very duanting to even think about, even worse you might mispell along the line.
We all can agree this approach is more prone to bugs.
Given a scenario where we need to take input from the user at screen3 and reflect the data in screen 1 and screen5, can you think of how to do this using the above approach?
Yeah i know...i know, i dont like stress too
A BETTER AND OFFICIALLY RECOMMENDED WAY TO MANAGE STATE
- Using Provider
I believe people reading this article already know how to add a package to thier flutter app.
Havng said that, go to your
pubspec.yamland add the provider package under dependencies
OKAY, WHAT'S THIS PROVIDER AND WHY SHOULD I USE IT?
Provider is one of the many state management options when using flutter. Its the officially recommended state manager by Flutter Team, and one of the simplest.
HOW DO I USE IT?
Lets be practical, lets refactor our codes and build our app using the Provider state management approach
Create a new folder provider inside the lib folder of our app
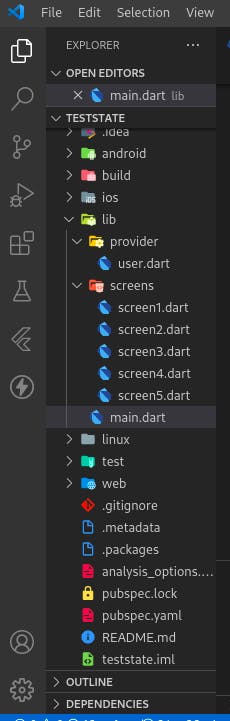
Create a new file user.dart inside the provider folder.
import 'package:flutter/widgets.dart';

class User extends ChangeNotifier {
  String _userRemarks = 'none';
  String get userRemarks => _userRemarks;

  void updateUserRemarks(String text) {
    _userRemarks = text;
    notifyListeners();
  }
}
So what on earth is that ChangeNotifier class our User class is inheriting from?.
Well according to flutter documentation "ChangeNotifier is a class that can be extended or mixed in, that provides a change notification API using VoidCallback for notifications". In simple english that basically means our User class has been blessed by the Flutter gods, its new powers includes
- ability to create and expose 1 or more value's that can be listened to from another class.
- ability to tell/notify whoever that is listening to its values , that there is a new data, and automatically trigerring a rebuild to show the updated data e.tc
Having said that
String get userRemarks => _userRemarks; is us flexing the power to expose values to whomever wishes to listen.
notifyListeners(); is us flexing the power to tell whomever that is listening to userRemarks that there is a new user remark, and automatically trigerring rebuild of whomever that is listening to show the updated data.
main.dart
import 'package:flutter/material.dart';
import 'package:provider/provider.dart';
import 'package:teststate/provider/user.dart';
import 'package:teststate/screens/screen1.dart';
import 'package:teststate/screens/screen2.dart';
import 'package:teststate/screens/screen3.dart';
import 'package:teststate/screens/screen4.dart';
import 'package:teststate/screens/screen5.dart';

void main() {
  runApp(
    ChangeNotifierProvider(
      create: (_) => User(),
      child: const MyApp(),
    ),
  );
}

class MyApp extends StatelessWidget {
  const MyApp({Key? key}) : super(key: key);

  @override
  Widget build(BuildContext context) {
    return MaterialApp(
      title: 'Flutter Demo',
      theme: ThemeData(
        primarySwatch: Colors.blue,
        visualDensity: VisualDensity.adaptivePlatformDensity,
      ),
      initialRoute: 'screen1',
      routes: {
        'screen1': (context) => Screen1(),
        'screen2': (context) => Screen2(),
        'screen3': (context) => Screen3(),
        'screen4': (context) => Screen4(),
        'screen5': (context) => Screen5(),
      },
    );
  }
}
ChangeNotifierProvider() is used to provide the values we exposed.
We also refactored our routing to use the Name Routing. read more on routing here
Now the screens where we update and listen
screen1.dart
import 'package:flutter/material.dart';
import 'package:provider/src/provider.dart';
import 'package:teststate/provider/user.dart';

class Screen1 extends StatelessWidget {
  var userRemarks;

  @override
  Widget build(BuildContext context) {
    return Scaffold(
      appBar: AppBar(
        title: const Text('Screen 1'),
      ),
      body: Container(
        padding: const EdgeInsets.all(20),
        child: Column(
          crossAxisAlignment: CrossAxisAlignment.center,
          children: [
            const SizedBox(height: 30),

            // Data From User
            Text(
              context.watch<User>().userRemarks,
              maxLines: 5,
            ),

            const SizedBox(height: 30),

            // TextField To Take Inputs From User
            TextField(
              autofocus: true,
              decoration: const InputDecoration(
                border: OutlineInputBorder(),
              ),
              onChanged: (value) => {userRemarks = value},
            ),

            const SizedBox(height: 30),

            // Butto To update Data & UI
            ElevatedButton(
              onPressed: () {
                context.read<User>().updateUserRemarks(userRemarks);
                Navigator.pushNamed(context, 'screen2');
              },
              child: const Icon(
                Icons.arrow_forward,
              ),
            )
          ],
        ),
      ),
    );
  }
}
screen2.dart
import 'package:flutter/material.dart';
import 'package:teststate/screens/screen3.dart';

class Screen2 extends StatelessWidget {
  var userRemarks;

  @override
  Widget build(BuildContext context) {
    return Scaffold(
      appBar: AppBar(
        title: const Text('Screen 2'),
      ),
      body: Container(
        padding: const EdgeInsets.all(20),
        alignment: Alignment.center,
        child: Column(
          crossAxisAlignment: CrossAxisAlignment.center,
          children: [
            // const Text('data'),
            ElevatedButton(
              onPressed: () {
                Navigator.pushNamed(context, 'screen3');
              },
              child: const Icon(
                Icons.arrow_forward,
              ),
            )
          ],
        ),
      ),
    );
  }
}
screen3.dart
import 'package:flutter/material.dart';
import 'package:provider/src/provider.dart';
import 'package:teststate/provider/user.dart';

class Screen3 extends StatelessWidget {
  var userRemarks;

  @override
  Widget build(BuildContext context) {
    return Scaffold(
      appBar: AppBar(
        title: const Text('Screen 3'),
      ),
      body: Container(
        alignment: Alignment.center,
        child: Column(
          children: [
            const SizedBox(height: 30),

            // Data From User
            Text(
              context.watch<User>().userRemarks,
              maxLines: 5,
            ),
            const SizedBox(height: 30),

            ElevatedButton(
              onPressed: () {
                Navigator.pushNamed(context, 'screen4');
              },
              child: const Icon(
                Icons.arrow_forward,
              ),
            )
          ],
        ),
      ),
    );
  }
}
screen4.dart
import 'package:flutter/material.dart';
import 'package:teststate/screens/screen5.dart';

class Screen4 extends StatelessWidget {
  @override
  Widget build(BuildContext context) {
    return Scaffold(
      appBar: AppBar(
        title: const Text('Screen 4'),
      ),
      body: Container(
        padding: const EdgeInsets.all(20),
        alignment: Alignment.center,
        child: Column(
          crossAxisAlignment: CrossAxisAlignment.center,
          children: [
            // const Text('data'),
            ElevatedButton(
              onPressed: () {
                Navigator.pushNamed(context, 'screen5');
              },
              child: const Icon(
                Icons.arrow_forward,
              ),
            )
          ],
        ),
      ),
    );
  }
}
screen5.dart
import 'package:flutter/material.dart';
import 'package:provider/src/provider.dart';
import 'package:teststate/provider/user.dart';

class Screen5 extends StatelessWidget {
  @override
  Widget build(BuildContext context) {
    return Scaffold(
      appBar: AppBar(
        title: const Text('Screen 5'),
      ),
      body: Container(
        alignment: Alignment.center,
        child: Column(
          crossAxisAlignment: CrossAxisAlignment.center,
          children: [
            const SizedBox(height: 30),

            // Data From User
            Text(
              context.watch<User>().userRemarks,
              maxLines: 5,
            ),
            const SizedBox(height: 30),
          ],
        ),
      ),
    );
  }
}
CONCLUSION
Now you can see how cleaner and more robust our code looks. This article is more of practical, less explanation. You can read more about flutter provider here
You can reach to me on Twitter : twitter.com/bazzscript Linkedin: linkedin.com/in/bezaleel-nwabia
Have an interesting project you would like me to hop on? Email: bezaleelnwabia@gmail.com
See ya!