Advanced Flutter: Introduction To Drawing Complex Shapes in Flutter With CustomPaint

👩💻📚🔍 Hi there! I'm a passionate software developer, constantly exploring the ever-evolving world of technology. With a voracious appetite for knowledge, I'm always diving into books and articles, seeking new insights and expanding my horizons. 💡✨ Curiosity is my driving force, and I'm on a never-ending quest to unravel the mysteries of the digital realm. Join me on this exciting journey as we navigate the realms of code and reach new heights together! 🚀🌟
Ever seen an insane UX/UI Mobile App design and thought the designer must hate developers?
Fret not child, Flutter Gods are with you. Here, take this Widget of magic, Whatever Shape you imagine to be in your flutter app, it will Make true. It's so powerful, Legends named it the CustomPaint Widget.
WHAT IS THE CUSTOM PAINT WIDGET ?
According to the Flutter documentation, "A CustomPaint widget is a widget that provides a canvas on which to draw during the paint phase".
If explaining this to a 5 year old, i will say its like, someone giving you a drawing board, different sizes of brushes and paints, and says, "you can draw anything you want", isn't that awesome?.
SO HOW DOES THIS CUSTOM PAINT WIDGET WORK ?
First, CustomPaint generates a canvas on which to draw, after which its asks painter to paint on the canvas. After it renders its child, the foregroundPainter property is then asked to paint. The painters are restricted to a region of a specified size. If they venture outside this allotted space, there may not be enough memory to rasterize the painting commands.
## The Properties of CustomPaint Widget

CustomPaint CustomPaint({
  Key? key,
  CustomPainter? painter,
  CustomPainter? foregroundPainter,
  Size size = Size.zero,
  bool isComplex = false,
  bool willChange = false,
  Widget? child,
})
From the above explanation and code snippet, note the following very important properties:
1 - painter
2 - child
3 - size
4 - foregroundPainter
Painter : -
The Painter property takes in a custom painter, which is responsible for what is drawn on the canvas, and the instructions from the painter property are alway's drawn first
Child : -
The child takes in a widget, which is rendered over the background of the canvas.
That is , it draws over/on top of the painter. The child can also determine the size of the canvas if the size property is not specified.
Size : -
The size property takes in a size, which is the size of the canvas. If the size is not specified, the size of the canvas is determined by the child.
ForegroundPainter : -
The foregroundPainter property takes in a custom painter, which is responsible for what is drawn on the canvas, the instructions from the foregroundPainter property are alway's drawn over the child.
before we get to the practical part where we write codes. Lets Discuss about CustomPainter Class and How it Works.
What is a CustomPainter Class ?
This class is responsible for drawing actual paintings. It has two major functions:
paint(): This is where we supply instructions for painting on the canvas. it takes in a canvas object, which is the actual canvas on which we draw, and a size object, which is the size of the canvas.
shouldRepaint(): When a new CustomPainter instance is provided, we can decide if we need to repaint the canvas based on the new parameters
Also note that the CustomPainter class is an abstract class. It is not meant to be used directly. Instead, it is meant to be extended by other classes.
Okay Lets Get To The nitty gritty, where we will see Flutter CustomPaint in action.
Create a new flutter app
flutter create custom_painter_app
Open the flutter project in your favourite code editor / IDE.
Before we proceed its crucial to understand the cordinate used by the canvas in order to draw anything on it.
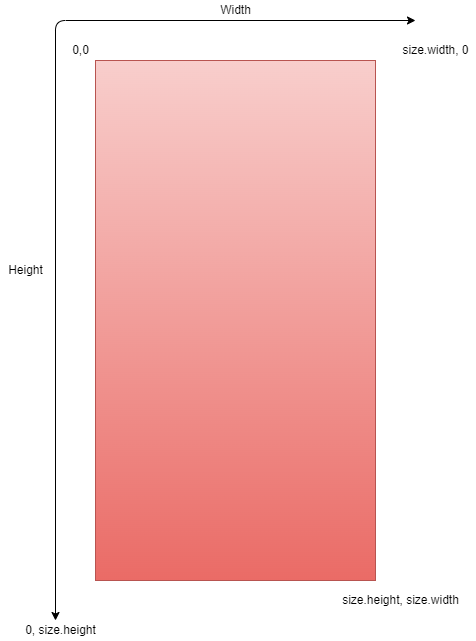
You can see that the origin (0, 0) is located at the top-left corner of the canvas. All drawings are done in connection to the origin, as that is where the painter starts.
1 ~ LETS DRAW A SIMPLE LINE
 Remove the whole existing code from the flutter project, that is the boilerplate code inside the
 main.dart.
Create a line_painter.dart file inside the lib folder.
Then add the following code to your main.dart file:
import 'package:flutter/material.dart';
import 'package:article_cp/line_painter.dart';


// Intro to our app
void main() {
  runApp(const MyApp());
}


class MyApp extends StatelessWidget {
  const MyApp({Key? key}) : super(key: key);

  @override
  Widget build(BuildContext context) {
    return MaterialApp(
      title: 'CustomPaint Tutorial',
      theme: ThemeData(
        primarySwatch: Colors.pink,
      ),

      home: MyPainter(),
    );
  }
}


// MyPainter class contains the CustomPaint() Widget
class MyPainter extends StatelessWidget {
  const MyPainter({Key? key}) : super(key: key);

  @override
  Widget build(BuildContext context) {
    return Scaffold(
      appBar: AppBar(
        title: const Text('CustomPaint Tutorial'),
      ),
      body: CustomPaint(
        // The Size Of The Canvas
        size: const Size(300, 200),

        // The First Painter In The Stack
        painter: LinePainter(),
        child: Container(),
      ),
    );
  }
}
Take a close look at the CustomPaint() widget,you should see the existing property and understand what each does, you will notice we supplied the painter property with a LinePainter(). The LinePainter() contains the instruction that is suppose to draw the line. Without further delay, go into the line_painter.dart file and add the following code:
import 'package:flutter/material.dart';


class LinePainter extends CustomPainter {
  @override
  void paint(Canvas canvas, Size size) {

    // The Paint Object, this can be likened to a brush, pen, or marker,
    // You can specify the size, color e.t.c.
    // And it is usually configured before painting, just like you would decide which color pen to draw on paper with.
    var paint = Paint()
      ..color = Colors.blue
      ..strokeWidth = 25.0;


    // Where the line should start drawing from
    Offset startPoint = Offset(0, size.height / 2);

    // Where the line should end drawing to
    Offset endPoint = Offset(size.width, size.height / 2);


    // We make use of the method inside the Canvas class to draw the line,
    // All we need to do is pass in the paint object and the start and end points.
    canvas.drawLine(startPoint, endPoint, paint);
  }

  @override
  bool shouldRepaint(covariant CustomPainter oldDelegate) {
   return false;
  }
}
2 ~ LETS DRAW A SIMPLE CIRCLE
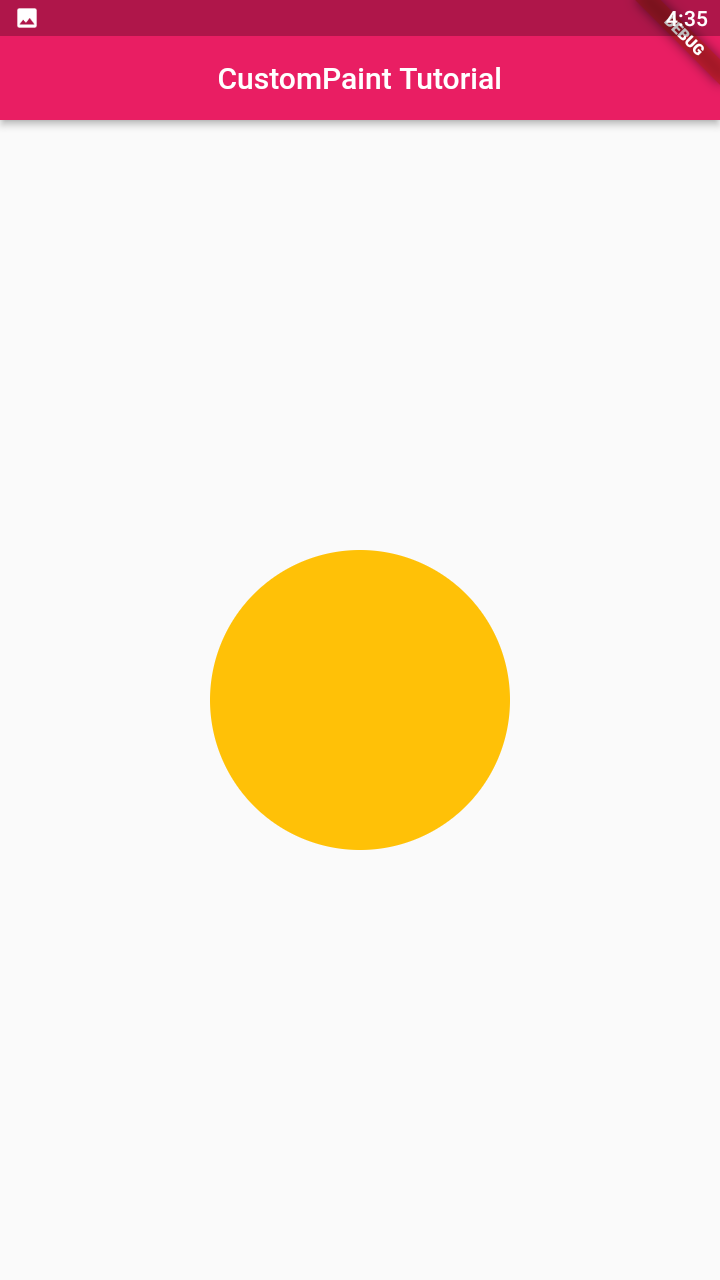 Create a circle_painter.dart file inside the
 lib folder. Go to the main.dart filr , inside the MyPainter Class which houses the CustomPaint() widget, change the LinePainter() to CirclePainter().
Then go to your circle_painter.dart file, and add the following code :
import 'package:flutter/material.dart';

class CirclePainter extends CustomPainter {
  @override
  void paint(Canvas canvas, Size size) {
    // The Paint Object, this can be likened to a brush, pen, or marker,
    // You can specify the size, color e.t.c.
    // And it is usually configured before painting, just like you would decide which color pen to draw on paper with.

    var paint = Paint()
      ..color = Colors.teal
      ..strokeWidth = 15;

    // The point to start drawing from, more like the center of the circle
    Offset center = Offset(size.width / 2, size.height / 2);

    // We make use of the drawCircle method inside the Canvas class to draw the line,
    // All we need to do is pass in the center point, the radius and the paint object.
    canvas.drawCircle(center, 100, paint);
  }

  @override
  bool shouldRepaint(CustomPainter oldDelegate) {
    return false;
  }
}
Before we proceed, lets take a look at the most common classes used in painting(that is used in the paint() method).
- Paint: We have encountered this class in the code snippets above. it stores things like color, stroke width, and other properties that are used to draw objects on the screen. Example Code:
var paint = Paint()
  ..color = Colors.teal
  ..strokeWidth = 22;
- Rect: A Rect class creates a virtual rectangle with a width and height. usually to draw a rectangle on the screen or set bounds for a shape inside. Example Code:
Rect.fromCenter(
  center: Offset(150, 150),
  width: 100,
  height: 100,
);
- Path:
When we need to draw custom shapes that are not among the predefined shapes, we use the Path class to draw custom shapes as it allows us to trace out a custom shape.
Example Code:
Path path = Path(); path.moveTo(0, 0) ..lineTo(200, 100) ..lineTo(100, 200) ..lineTo(0, 0);Lets Draw More Complex Shapes!
1 ~ Draw a Pacman
 Create a new file inside the lib folder called pacman_painter.dart.
Go to main.dart file, inside the MyPainter Class which houses the CustomPaint() widget, change the LinePainter() to PacmanPainter().
Then go to your pacman_painter.dart file, and add the following code :
import 'package:flutter/material.dart';

class PacmanPainter extends CustomPainter {
  @override
  void paint(Canvas canvas, Size size) {
    var center = size / 2import 'package:flutter/material.dart';

class PacmanPainter extends CustomPainter {
  @override
  void paint(Canvas canvas, Size size) {
    var center = size / 2;
    var pi = 3.141592653589;

    var paint = Paint()..color = Colors.yellow;
    canvas.drawArc(
      Rect.fromCenter(
        center: Offset(center.width, center.height),
        width: 150,
        height: 150,
      ),
      0.4,
      2 * pi - 0.8,
      true,
      paint,
    );
  }

  @override
  bool shouldRepaint(CustomPainter oldDelegate) {
    return false;
  }
}
;
    var pi = 3.141592653589;

    var paint = Paint()..color = Colors.yellow;

    // The Method TO Draw An Arc
    canvas.drawArc(
      Rect.fromCenter(
        center: Offset(center.width, center.height),
        width: 150,
        height: 150,
      ),
      0.4,
      2 * pi - 0.8,
      true,
      paint,
    );
  }

  @override
  bool shouldRepaint(CustomPainter oldDelegate) {
    return false;
  }
}
2 ~ Draw a Complex Curved Shape
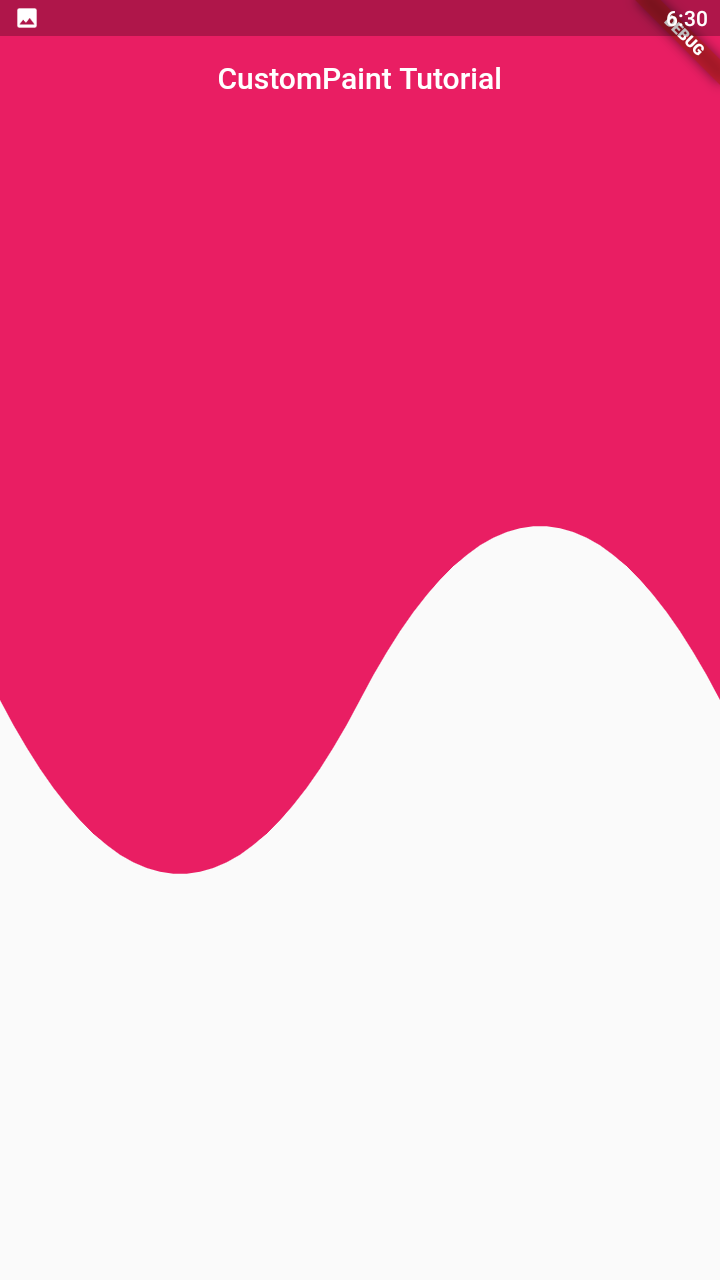 Create a new file inside the lib folder called curved_painter.dart.
Go to main.dart file, inside the MyPainter Class which houses the CustomPaint() widget, change the LinePainter() to CurvedPainter().
Also in the MyPainter Class, inside the Scaffold, go to the appBar and add this code: elevation: 0.0.
Then go to your curved_painter.dart file, and add the following code :
import 'package:flutter/material.dart';

class CurvedPainter extends CustomPainter {
  @override
  void paint(Canvas canvas, Size size) {
    var paint = Paint();
    paint.color = Colors.pink;
    paint.style = PaintingStyle.fill; // Change this to fill

    var path = Path();

    path.moveTo(0, size.height * 0.5);
    path.quadraticBezierTo(size.width * 0.25, size.height * 0.8,
        size.width * 0.5, size.height * 0.5);
    path.quadraticBezierTo(
        size.width * 0.75, size.height * 0.2, size.width, size.height * 0.5);
    path.lineTo(size.width, 0);
    path.lineTo(0, 0);

    canvas.drawPath(path, paint);
  }

  @override
  bool shouldRepaint(CustomPainter oldDelegate) {
    return false;
  }
}
Canvas provides a way to draw a path using the drawPath method. Here, the Path class is very useful in moving the pointer. The curve is drawn using the path.quadraticBezierTo(x1, y1, x2, y2) method, which draws a curve to x2, y2 using the control points x1, y1.
As you can already guess, the real challenge here is identifying the control points while developing. If you're developing a User Interface that has a lot of curves, identifying the control points can be a challenge.
A brillant & legendary developer named Paras Jain has created a tool Flutter Shape Maker, to spare other flutter developers the blushes.
Its simple to use. You simply select your canvas, set the canvas size and simply start drawing!. It enables us draw any type of shape, and it automatically generate the flutter code for us!.
You can view the complete source code for all the codes in this article.
LINK TO TOOL : -FLUTTER SHAPE MAKER
LINK TO 10MINS VIDEO TUTORIAL BY PARIS JAIN ON HOW TO USE THE TOOL :- ..
Conclusion
This article is more of an introduction than a deep dive, i went on to show you a tool that will aid you in drawing more complex shapes, but overall i hope this article has helped you to get a basic grasp on using the CustomPaint Widget.
Wanna ask me anything about Flutter ? contact me on twitter @bazzscript


