


Run individually step by step, make sure nothing else is running at each instance.
1- Download Android Studio , then install android studio (Make sure your system is connected to the internet during installation) during installation android studio will automatically setup something called ANDROID SDK
After installation of android studio
2- Download Flutter Sdk and set it up (the flutter download page has a step by step on setting it up on Windows, Mac Os and Linux)
3- Download Vs Code and install
4- Open VsCode go to the extension Tab
5- Search for Flutter, click to Install it
6- Search for Dart, click to Install it
7-Open Command Line Run " flutter doctor " and make sure everything is ticked good.
SKIP TO 8 IF EVERYTHING IS TICKED GOOD
The Most Common Errors At this stage
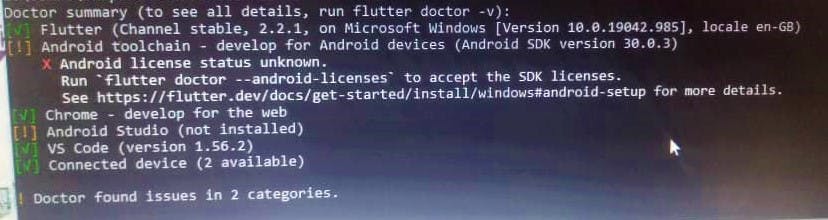
SOLUTION
- Launch android studio, Then go to config and click on Sdk manager, go to Sdk tools click on Android Sdk command line tools, checked the box and apply, it will download the latest one and install it. Then open command line,
Run the following commands
Accept all (keep entering y).flutter doctor –android-licensesflutter config --android-studio-dir="C:\Program Files\Android\Android Studio
After the last command everything should be ticked goodflutter doctor
8- Enable Android Developer Mode on your device.
Follow this step to enable developer mode on your phone
- Open the setting on your Android device.
- Now on the Android Settings screen, tap on About phone option. If you are using a LG device then you have to dig even deeper. Open Settings and scroll down to the bottom and tap on System > Advanced > About Phone.
- On the About phone screen scroll down to the bottom of the screen to Build number option.
- Now once you start tapping on the Build number option, you will see a pop-up message that you are now “X” steps away from being a developer.
- Continue tapping on the Build number option until you see a screen to Re-enter your password. Since developer mode is one of the most powerful features in Android therefore to prevent any unauthorized access, you have to enter the device password that you have set to continue further.
- Now once you enter your device password, it will show a message at the bottom of the screen that is, you are now a developer.
Enabling developer option on Android is just half the work done, as to use developer option on Android you also have to know how to access it.
Tap on the Settings (gear icon) icon to open Settings on your Android device.
On the Settings screen scroll down to the bottom of the screen and tap on the System option.
Now on System screen tap on Advance, and from more System settings tap on Developer options just below Multiple users.
On the Developer options screen, you can see various options that are hidden till now from you.
USB debugging: One of the most important developer options used by the developers to allow a communication between an Android device and computer running the Android SDK. This is the one we are interested in, click on it to enable it.
9-Collect your USB cord & connect your android phone accept every prompt you might see on your phone after plugging in your phone
10- open command line and run " flutter devices " & your phone will be listed there
YOU ARE SET TO MOVE
VS CODE WILL BE YOUR CODE EDITOR
So, each time you run your app, flutter automatically Display's it on your physical phone (you shouldn't be using your phone while plugged in for development purposes)
And that's it
Please if you get stuck at any stage, Ask questions in the comment. Am ready to help you out in this adventure 🚀